Monday, July 14, 2025

Green Velvet in July?


I've been endeavoring to both sew items I need as well as whittle down the unfinished to do pile encroaching upon my work table. Sometimes my project reasons are practical. Working on a green velvet skirt in July just because the green thread was still in my machine after making the Minecraft Ottoman...we'll call this a whim.


This leftover intention from my Mother Christmas Costume has been waiting on my table since 2022, and my notion to make as many skirts as able as seen in my 5 Skirts, 1 Pattern Video persists. Here the center panel and the two back pieces from the Butterick 6196 source remained to size while each side panel was folded and reduced to fit the remaining green curtain fabric. Although the front is its own panel, I cut the back and side pieces as one continuous back. This isn't the most super quality material and it doesn't fray, however I wanted as much fullness with as little seams as possible. While the skirt was laid out flat on the floor, it was easier to pin the hem with several turn under folds before bee-lining every thing through my machine. I surprised even myself when this entire cutting and sewing process only took several hours! If your machine cooperates on decent material with a pattern you know, sewing can be pretty quick and easy, who knew?


After stay stitching the top line, I pinned and pleated the skirt to size on my dress form. Cutting a short back line created a place for my opening skirt placket, but these pleats and folds did become a little too thick for the machine. Fortunately, the original six tab top curtain pieces came in handy as the waistband! After seam ripping them all open, I sewed them all together as one continuous length – retaining their folded seam lines for the waistband and adding a double strip of thrifted black bias tape for reinforcement. The waistband was pinned and basted before a tight running back stitch in front and a final inside stitch encasing the skirt waistband. Black on black sewing I expect to be tough, but the worst part here was the dark green on dark green tiny stitches making my eyes go wonky! I turned to my Giant Button Jar for a unique green button before a finishing press. Initially, I was tempted to do a black velvet trim from my recent Joann Haul but thought it might be too heavy. However a day later I decided to turn up the hem again with some supporting tape and do a wider black velvet panache with some Dollar Store Halloween ribbon. I like the idea that my boots would show underneath with a coordinating black sweater and belt – even though it will probably be a mild 60F in December when I eventually wear this!


It's actually quite tempting to add even more rows of trim, maybe even some black fringe to match the green velvet dramatics! Of course, I intend to do a matching vest with the last remaining material, too, and those future trims should also coordinate with the skirt. Then again, I am but one person doing one impulse project at a time and I have more seasonal summer tops to make. Although this wasn't my next intended project, this unique, feel good look from thrifted curtains is a simple can do that inspires me to continue on those more immediate wardrobe needs. With no second guessing, mistakes, or re-dos thanks to previous pattern use and sewing know how, it's pretty amazing what wearable in a day can be accomplished. So what if it's holiday green in July?


For more project photos, visit Kbatz Krafts on Facebook or Instagram and join us on Blue Sky. Read about further sewing shenanigans in our Kbatz Krafts Archive including:


The Orange Tablecloth Skirt

Black and Orange Polka Dot Skirt 2.0

Reversible Red Skirt

Another Halloween Dress


Tuesday, July 1, 2025

Making a Minecraft Ottoman


My Husband may not want more pillows for the office bean bag (spoiler alert: he got them!). However he does need an ottoman under his desk to alleviate the 9 to 5 leg fatigue as well as the work-from-home perils of cats determined to be in his lap making for some surprisingly uncomfortable positioning. Now at last, my Stuffed Pumpkin Ottoman expertise can be put to good use thanks to some Minecraft themed fabric!


Seen previously in my Treat Yourself Haul three years ago, these two full Minecraft bolts were $14 each at Goodwill. While the blue sword print material has already been put to use as a duvet covert with matching pillowcases, these aren't the softest cotton and this green bolt actually says it's not intended for children's pajamas. What then was I to do with it? Alas, this green print is ideal for a square ottoman design befitting the game's grassy building blocks. Initially I intended this as a no-sew, all hot glue one day project. However the shorter fabric width meant I couldn't cut out three downward blocks and three sideways blocks to create a six sided square to stuff as one whole piece. Instead, two pieces were required with four panels that would be the bottom, back, top, and right side while a separate piece would be the front and left side. Thankfully, unlike my original Black and Orange Polka Dot Skirt Attempt, the direction of the Minecraft print didn't matter. Although I originally wanted to do a twenty inch square, the eighteen inch cardboard piece I used to measure, trace, and base my block panels turned out to be plenty big enough! Maybe even too big – if one's office wasn't already a slightly comical area of video games, collectibles, and Minecraft Curtains.


After cutting my shapes, I realized that if my sewing machine cooperated – unlike with the Cheap Elsa Costume – sewing these straight lines would be a lot faster then folding all the seams and hot gluing them slow and pretty. Fortunately, these quality materials went smoothly with no tension issues, threads breaking, or jams. After turning the giant square right side out, it was time to put in the simple cardboard base and stuff this mother! I used the last of the leftover recycled denim packaging I saved layered with more random Styrofoam and plastic bags. Sometimes trash comes in handy! My mother had also previously given me foam blocks from before she retired as a manager at TJX. These were actually boot packing supports that she thought I might like to use as more Candy Cane Christmas Candles, teehee. While I was in this stitch and stuff phase, I also used two odd rectangle panels from my two piece cut out and put them together to make a matching pillow, because why not? The world is harsh, we need more pillows – especially cute ones that work out unlike my Wonky Halloween Pillows.


After pinning the top, this giant ottoman was easy to hand sew closed just like a pillow. I refer to the top, but this fun block can really be tossed and turned in any direction. The soft lines and comfortable filling make for a fine place to sit or put up your feet as intended. The cats have already given it their seal of approval, and that seemingly too large size means there is enough room to put up your feet and have a cat sit on it, too – if they let that happen, that is! It does bug me, however, that thanks to the two wrapped panel corners, this isn't a perfect looking square as per the game. Had I sewn all six panels individually and maybe lined each of those seams with a thin cardboard strip, this might have been a more rigid design. If this was a formal living room piece, I probably would have gone all out with the curved upholstery needle, wood supports, piping, and fancy trims. Fortunately, that's not necessary for this fun under the desk comfort. Besides, I don't have to live with this project – my Husband does, hehe.  😁


Follow Kbatz Krafts on Facebook and Instagram for more project photos or join us on Blue Sky! Browse the Kbatz Krafts Archive for more sewing and crafting adventures including:


The Orange Tablecloth Skirt

How to Make Stuffed Pumpkins

CardboardHalloween Banner

Memento Mori Sewing


Monday, June 16, 2025

Wonky Halloween Pillows Deux 🥴


Thanks to my Haulloween '24, Spring meant it 'twas time to clean out my Halloween pajamas drawer and turn my threadbare shirts into more Halloween Pillows! The sound upcycle idea, unfortunately, was better than the askew execution this time.


Previously, those retired shirts made for some cute, sturdy decorative pillows. However, like my dress turned Tie Dye Pillow, these shirts have seen their day – resulting in stretched seams and frustrating hand sewing. Working within their shapes took finagling, too. Preserving the fun Halloween designs while avoiding soil spots and the cat claw pinpricks that apparently proliferate most of my clothes was not easy, and I even resorted to matching material cut from the discard sleeves to disguise some of the tiny holes. Because of such threadbare inferiority, the plastic grocery bags and fabric scraps used in my Stuffed Pumpkins wouldn't do without a layer of smoothing PolyFil to hide these sheer when stuffed pillows. During this venture for me, I also recovered some of my husband's toss pillows on our me-made bean bag with some of his formerly beloved t-shirts. However those Pixar and Doctor Who pillow transformations turned out beautifully – perhaps a statement on the superior quality of men's t-shirts versus the fast fashion of women's Halloween cheapness. Typical!


An older bed pillow was also used to stuff the paw print material from one of my Joann Hauls for an easy cat bed – which true to the Attempted Cat Cushion, none of them like. Unfortunately, even I disliked my own Boo! Padded sign creation. I don't care for the causal Halloween adoption of “boo” and “spook” ignoring the previous inflammatory nature of these terms, and initially I was unsure how to re-purpose this design – if at all. The very old glow in the dark shirt lettering was the only salvageable portion, so I added a small black ribbon – mistakenly basted the wrong way inside first – before using some scraps from the Cheap Elsa Costume to pad the hanging rectangle. Although I may repeat this idea with better materials in the future, this was not the bemusing glow in the dark pop art I had hoped. It's a hideous, crooked little thing that can't even be excused as intentionally primitive or childlike or saved by it's glow in the dark fun. All I see are the stitching mistakes, and I actually wondered if it's even worth sharing such a shitty, embarrassing, waste of time project.


Fortunately, even failures teach a sewing lesson. These wonky Halloween pillows will float around my basement studio and my niece's kid station, so their potential to not survive and end up as inserts for the next round of Halloween pillows is okay. I'm the one who has to learn not to wear something low quality until it is falling apart and then try to upcycle it! I've carried numerous other pillows from house to house that have been recovered over time – including sports team t-shirts redone as lumbars with the $1 luxury fabric swatches from before the Pandemic when the nearest Joann by me had closed. Do I need more pillows? My husband would say I'm the lady in the insurance commercials that has left nowhere to sit for all the pillows. However, the easy upcycle preservation of a charming design or sentimental shirt remains paramount. This is great sewing practice anyone can do. I don't share my goofy sewing and craft adventures to be instructional perfection. Failed Halloween pillows such as these are more about inspiring a not what it is but what it could be ideology and making it happen. Even if that's not on this project.


For more sewing updates, join me on Blue Sky or for project photos follow Kbatz Krafts on Facebook or Instagram. Browse the Kbatz Krafts Archive for past projects including: 


The Orange Tablecloth Skirt

A Black and Orange Polka Dot Apron

Halloween Shoe Wreath

Mini Pumpkin Garland


Tuesday, June 10, 2025

Drafting a Nightgown Pattern


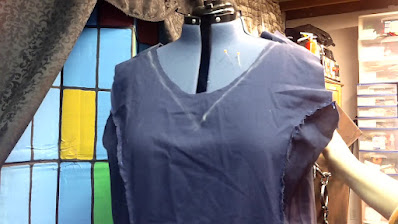
Before I completely gave a long thrifted, too big, paint stained, and threadbare nightgown over to being my official messy painting smock; I decided to cut it apart and take the pattern from it. Not only did I need to replace the downgrade, but this drafting exercise has become an invaluable lesson in flattering fittings and comfortable alterations.


Let us go back to Summer 2023, when I actually filmed several hours of footage documenting this process – from seam ripping the sleeveless source and tracing out the front, back, and two side pieces on scrap paper to the wearable mock up made from navy sheets and ultimately a nicer black satin nightgown. I was gravely ill and ended up having surgery, which expedited the need for these new post recovery nightgowns. Unfortunately, my poor health
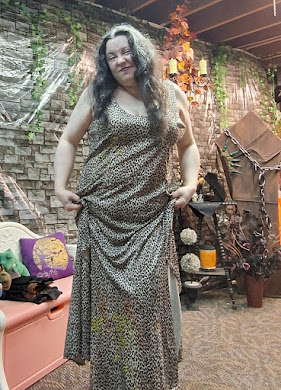
really shows in these videos from the time. It was a therapeutic process to focus on useful, necessary garments one stitch at a time, occupying my mind from all the bad things that happened that year. However the footage is too gaunt and depressing to share. It would also be a lot of editing, and now I much prefer single shot, chatty videos and Fun Hauls. My main takeaway from this footage is that the faded navy sheet attempt was for comfort when I felt bad, and the smexy black satin was for when I wanted to feel good. Fortunately, this worthwhile venture has lead to more lounge wear and hopefully nicer dresses in the future. I've posted on Blue Sky about the subsequent, long gestating brown dress and matching housecoat set also derived from this pattern. Alas, I will soon address how that shamefully sat on my dress form these past two years once I finally complete it presently. Hems!!! 🤦🏻‍♀️💪🏻


So far I have four different garments from this relatively simple pattern thanks to the princess seams in front and back. Along with the two side pieces, a variety of changes can be made for a loose or flattering fit as desired. I knew the original nightgown cut apart and sewn back together again to be the paint smock was already too big, so the mismatched navy sheets mock up could carry that largeness for post-surgery comfort and I didn't care if it got ripped or dirty. Here I pleated the side seam under the arms for a baggy, ye olde pinafore kind of ease. I'm not sure now why I used the leftover discolored sheets to make a ruffled hem at the bottom, as the ruffle is a gathered heavy that makes the nightgown hang somewhat rather than drape naturally. Indeed, hems have inexplicably been a constant problem with these projects – needing to redo the lining hem on the brown dress is what frustrated me into stopping back in 2023. The black satin poly nightgown went quickly despite changes to take in the side seams, shorten the shoulder, and make a V neckline with a small pinch pleat. This created a more fitted front with the larger ease in the back. I don't like the high-low dresses fad because they always seem mis-cut to me, and this nightgown suffers from a similar problem! It looks like the front hem is over inch or so higher than the back hem that touches the floor when there shouldn't be that much difference. My husband tries to tell me it doesn't matter, but I can't look at the nightgown or wear it without noticing, so actually, I don't end up wearing it as much.


As yet I'm in media res on perfecting this pattern with the brown housecoat set, and I intend to put some of the orange material from my recent Joann Hauls to good use here. Instead of costumes or crafty things, this is the practical sewing that my father always wondered why I didn't usually do. I needed garments. I made them. They are not de facto but useful nonetheless. This is a pattern copy that I know needs adjustments and customization every time, and it's okay to continually hone this basic princess seam design. Certainly, this may seem simplistic or too basic to advance sewers. However working from a throwaway garment with practice materials toward a preferred block pattern is a great place to start for beginners. Who needs the fear of a confusing commercial pattern and cutting an expensive fabric too small?! Although I turned my last threadbare dress into a Tie Dye Pillow, the cumulative practice here inspires me to take more patterns from my other nicer dresses also nearing the end of their usefulness.


Follow more sewing adventures on Blue Sky or visit Facebook and Instagram for more project photos. Browse our Kbatz Krafts Archive or read more:


The Cheap Elsa Costume

A Christmas Princess Costume

5 Skirts 1 Pattern Video

The Orange Tablecloth Skirt