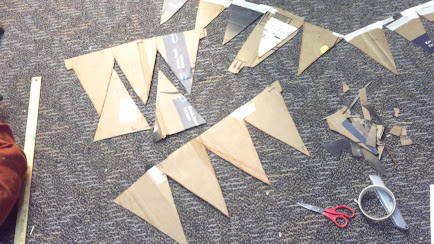
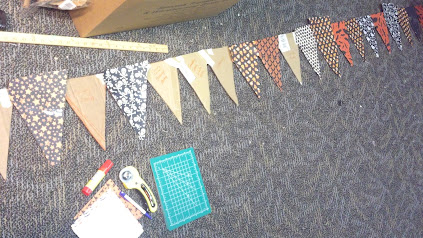
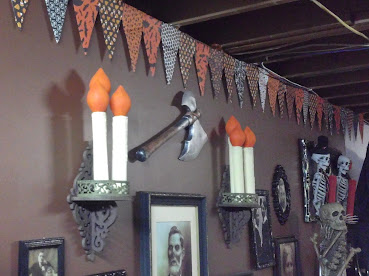
Since May, this cardboard banner project has been laying on my basement studio floor in various configurations. 2023 has been a very tough year, and more crafts ended up piled on top of this recycled whimsy as at times I worked on it vigorously and other times it sat all but finished. Originally this was a little piece of Halloween for the Spring, but now it's a bemusing reminder of the October that wasn't.
Part of crafting is seeing something as not what it is but what it could be, and using recycled materials for holiday art is a great way to get into this mentality. I've been progressively trying to disguise some of the unsightly areas of my basement studio, and a Halloween banner seemed the perfect way to hide the top of the unfinished walls and put some cardboard to good use. People today always have a lot of boxes handy amirite? After measuring the wall where I wanted to place banner, I spent a day of trial and error cutting and geometry, initially intending for a double row of triangles. Unfortunately, the angles for a larger base with a smaller row of triangles on top became uneven for the fifteen feet length needed. After fighting more maths, using one large row won. I also realized thicker cardboard was too difficult to cut, and as I cut and traced numerous triangles per cardboard, I had to accept that none of the triangles were going to be precision perfect.
Cutting with various knives, rotary cutters, and scissors took longer than expected and really hurts your hand after awhile! Eventually, I had my number of triangles necessary, taped their ends together, and hot glued a backing cardboard strip across the banner for support. Now I was excited to get to the actual Halloween paper layer! Previously I used some of the craft store clearance Halloween Placemats ream in my Halloween Canvas Art, and I also found a $3 smaller cardstock ream at Goodwill. After going with orange, black, and white papers for a cohesive theme, I practiced laying out my sheets and marking the cardboard per paper so the same or similar papers were not near each other. The placemat paper was easier to fold and tape than the cardstock, and again it took a surprising amount of time hunched over and applying the paper with glue sticks and tape. Some of the square cardstock had to be cut on an angle to fit the triangle, and occasionally you can see that glare of piecing tape. However in working with cheap, found, piecemeal recycled materials, I again had to let go any perfection. Although, I probably made this seemingly simple project a lot more complicated than it had to be!
Dollar store orange tubing glued every third triangle became my hanging loops thumb-tacked into the beams where I wanted it to hide my basement ugly. I found out this is a charming little accent once I was able to finish said loops and actually hang this long gestating whimsy! I wanted to use the Halloween themed paper in my stash, but a more creative artist could probably paint custom design on their cardboard. I also think this is an excellent project for the family or classroom using holiday wrapping paper – reversible or embellished for any season! I still have the smaller triangles I cut out and would like to glue them onto the rest of the orange tubing for a more simple, free hanging banner, perhaps with leaves or florals to disguise more studio unsightly.
Despite minor imperfections and recycled materials, the possibilities are endless! Will it last longer than it took me to make it? Probably not. Is it totally cheap? Absolutely! Am I content with my found Halloween art? 110%.
Follow Kbatz Krafts on Instagram and Facebook for more Project Photos!
Visit our Kbatz Krafts Archive for more crafts including:
Decorating Like Dark Shadows Video Series


No comments:
Post a Comment